Governing a Web Service using IdentityNow
15.07.20 – Die Sicherheit und Zugriffskontrolle von APIs und Mikrodiensten kann durch die Anbindung an SailPoint IdentityNow erheblich verbessert werden. Da die Anbindung jedoch nicht intuitiv ist, wollen wir Ihnen mit diesem Artikel das Vorgehen für eine einfache Anbindung näherbringen. Es wird gezeigt, wie Berechtigungen und Accounts mit dem Web Services Connector von SailPoint aggregiert werden können, auch wenn hierzu mehrere Endpoints zusammenhängend genutzt werden müssen.
In today’s infrastructure there is usually one or more web service or cloud based system used by the company. To govern the access to this cloud based system, it is helpful to connect the existing web services to an existing Identity and Access Management tool.
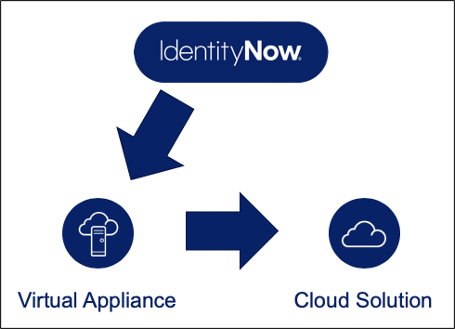
Graph.1: Architecture for the connection to the cloud solution.
In this example I will show you how to simply add a system to an IdentityNow instance using the Web Services Connector provided by SailPoint.
Preconditions: API Documentation
The precondition for connecting the cloud based solution to IdentityNow is a web facing application programming interface (API), which will disclose information about the accounts and entitlements on the system on hand.
This API is usually secured and you need to implement more complex security into this connector. To keep this example simple, this will not be covered by this article.
Here we will use an API which will produce JSON objects and has the following endpoints to receive data from the system.
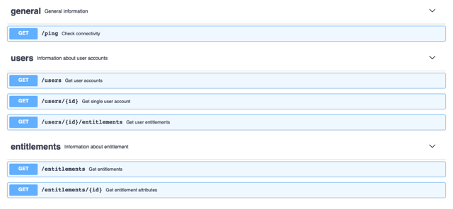
These are the endpoints for the cloud solution, we are going to connect to IdentityNow (your solution could look similar to this).
Test Connection
The first implemented operation is going to test the connection from your Virtual Appliance to your cloud solution. As seen in the list of endpoints, there is an endpoint available to check the connectivity with the route /ping. In your case this could be an endpoint to check the used authorization token.
To implement this, we need to add a new operation from the type “Test Connection” and we will name it “Ping”.
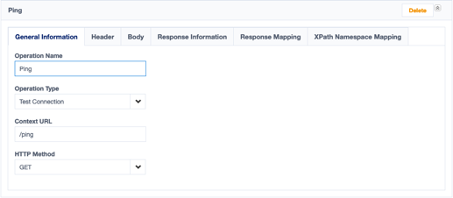
Graph. 2: The configuration for Ping.
We will assume, that a successful connection will result in a response with the success code of 2**. This needs to be added in the Response Information tab.
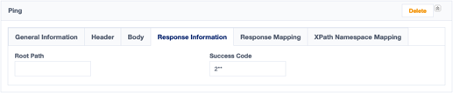
Graph. 3: Response Information for testing the connection.
After successfully connecting the API to IdentityNow, the next step is to aggregate the entitlements.
Read the full paper here.